Running an AI locally keeps your data 100% private, works offline, and costs absolutely nothing. This step-by-step guide covers how to install Ollama, download Meta’s Llama 3.2, and create a one-click desktop app that instantly fixes your grammar.
Part 1: Install Ollama and Llama 3.2
If you are starting on a fresh Debian system, open your terminal and run these steps to get the AI engine ready:
1. Install the Ollama Engine
Download and install the official Ollama environment using this single command:
bash
curl -fsSL https://ollama.com | sh
Use code with caution.
2. Download the Llama 3.2 Model
Pull Meta’s lightweight Llama 3.2 (3B) model to your computer:
bash
ollama pull llama3.2
Use code with caution.
To verify that the model downloaded successfully, you can run ollama list.
Part 2: Create Your Automated Grammar App
By default, Llama wants to converse casually. We will build a customized profile called a Modelfile to restrict it to only fixing grammar, then wrap it in a clickable shortcut app.
1. Configure the Automated Rules
Run this block to write the configuration profile that tells the AI how to behave:
bash
cat << 'EOF' > ~/Modelfile
FROM llama3.2
SYSTEM You are an expert grammar corrector. Your only job is to correct the grammar and spelling of the text the user pastes. Reply ONLY with the corrected version. Do not explain the changes. Do not say "Here is the corrected text". Just output the clean text.
EOF
Use code with caution.
2. Compile Your Dedicated Model
Build a custom model variant named grammar using the profile rules we just wrote:
bash
ollama create grammar -f ~/Modelfile
Use code with caution.
3. Make the One-Click Desktop Application
Run this final block to create a launch shortcut on your desktop, make it clickable, and add it directly to your system’s main application menu:
bash
cat << 'EOF' > ~/Desktop/llama-grammar.desktop
[Desktop Entry]
Version=1.0
Type=Application
Name=AI Grammar Fixer
Comment=Fixes your grammar instantly using Llama 3.2
Exec=ollama run grammar
Terminal=true
Icon=accessories-text-editor
Categories=Utility;
EOF

# Make the icon launcher clickable
chmod +x ~/Desktop/llama-grammar.desktop

# Sync it to your system app overview menu
cp ~/Desktop/llama-grammar.desktop ~/.local/share/applications/
Use code with caution.
How to Use Your New App
Open your Debian Applications Menu or Activities Overview.
Search for “AI Grammar Fixer”.
Optional: Right-click the icon and choose “Add to Favorites” to pin it to your desktop panel or dock.
Click the app. A clean terminal window will instantly pop open displaying the >>> prompt.
Paste your broken text (using Ctrl + Shift + V or right-click) and hit Enter.
The local AI will immediately output the perfectly corrected grammar without any extra commentary! When you are finished, just close the window.
A browser-based tool for choreographing combat animations without recompiling your game.
What This Tool Does
You have a set of player attack animations and a set of NPC reaction animations. You need to define, for each attack:
Which NPC reaction(s) fire — one or more, chosen randomly
Where the NPC stands — per-attack distance in meters
When the reaction fires — as a fraction of the attack clip (e.g. 60%)
How fast the reaction plays — a speed multiplier
Doing this by editing JSON and refreshing the game is agonizing. This tool lets you do it visually, preview it live in 3D, and export the config as a single JSON file your game reads at runtime.
Feature List
Feature
What it does
Auto-discovery + fallback
Loads GLBs from folder listing or a hardcoded list
Auto-classification
Files starting with NPC_ are NPC assets; everything else is a player attack
Blender-style editor
Bottom split-pane that keeps the 3D view visible
Live previews
Click ▶ on any row to play that clip on the 3D scene
Per-attack sliders
Range, hit timing, and NPC speed — all saved per attack
Auto-preview on release
Releasing a slider plays the result instantly
localStorage persistence
Pairings save automatically, survive refreshes
Schema migration
Old saved data auto-upgrades to newer formats
JSON export / import
The config contract between tool and game
Static minimum range
Slider can’t go below a value that would clip the models
Architecture
text
┌─────────────────────────────────────────────────────────┐
│  PAIRING EDITOR (browser tool)                          │
│                                                         │
│  • Loads GLBs, classifies player vs NPC                 │
│  • Bottom pane: attacks × NPCs                          │
│  • ▶ preview per row                                    │
│  • + / × to link / unlink                               │
│  • 3 sliders per attack: range, hitAt, npcSpeed         │
│  • Auto-saves to localStorage                           │
│  • ↙ Import / ↗ Export as JSON                          │
└──────────────────────────┬──────────────────────────────┘
                           │
                           ▼  fight_pairings.json
┌─────────────────────────────────────────────────────────┐
│  GAME RUNTIME                                           │
│                                                         │
│  • Loads GLBs, reads pairings.json once                 │
│  • On attack: look up entry, position NPC, schedule     │
│    reaction, play at tuned speed                        │
└─────────────────────────────────────────────────────────┘
The tool’s only job is to produce the JSON. Everything else — the UI, the storage, the previews — exists to make that JSON cheap to produce and easy to iterate.
Feature 1 — File Loading That Never Fails
Browsers can’t enumerate a folder. But a directory listing (like Python’s http.server generates) exposes <a href="file.glb"> links we can scrape. The problem: as soon as you add an index.html, the listing disappears.
Solution: hybrid loading. Try to scrape; merge the result with a hardcoded fallback list. The tool always has files to work with.
js
const FALLBACK_FILES = [
    'Boxing_clean.glb',
    'flying_kick_clean.glb',
    'Headbutt_clean.glb',
    'Kicking_clean.glb',
    'leg_sweep_clean.glb',
    'martelo_2_clean.glb',
    'quad_punch_clean.glb',
    'roundhouse_kick_clean.glb',
    'surprise_uppercut_clean.glb',
    'NPC_receive_punch_to_the_face_clean.glb',
    'NPC_receive_stomach_uppercut_clean.glb',
    'NPC_surprise_uppercut_clean.glb',
    'NPC_taking_punch_clean.glb',
    'NPC_knocked_out_clean.glb',
    'NPC_standing_death_backward_01_clean.glb',
    'NPC_standing_death_forward_01_clean.glb'
];

async function discoverFiles(){
    try {
        const res = await fetch(location.href, { cache: 'no-store' });
        if (!res.ok) return [];
        const text = await res.text();
        const re = /href\s*=\s*["']([^"']+\.glb)["']/gi;
        const found = new Set();
        let m;
        while ((m = re.exec(text)) !== null){
            const name = decodeURIComponent(m[1]).split('/').pop();
            if (name) found.add(name);
        }
        return [...found];
    } catch { return []; }
}

/* In boot(): */
const discovered = await discoverFiles();
const merged = Array.from(new Set([...FALLBACK_FILES, ...discovered]))
    .filter(n => /\.glb$/i.test(n));
Also dedupes foo.glb vs foo_clean.glb — keeping only the _clean one:
js
function dedupeClean(files){
    const set = new Set(files);
    return files.filter(f => {
        const plain = f.replace(/_clean\.glb$/i, '.glb');
        if (plain === f) return true;
        return !set.has(plain);
    });
}
The editor opens from the bottom of the viewport. The 3D scene stays visible above it. This is the single most important UX decision — every tuning action has immediate visual feedback.
What was tried and rejected: a dynamic hip-bone collision solver that pushed the NPC when the player lunged forward. It oscillated with the smooth-slide system and pushed the NPC back on attacks where the models didn’t visually overlap. Replaced with the static slider bound above — simpler, more predictable, no shake.
Full Source
The complete single-file implementation is one HTML file with four sections:
That single lerp is what makes all per-attack distance changes feel animated instead of snappy.
Integration with Game Runtime
The tool’s output is a plain JSON file. In your game:
js
const pairings = await fetch('fight_pairings.json').then(r => r.json());

function onPlayerAttack(attackFile, attackClip){
    const entry = pairings[attackFile];
    if (!entry) return;

    /* 1. Position the NPC at the tuned distance */
    npc.position.z = entry.npcRange;

    /* 2. Schedule the reaction at the tuned hit frame */
    const hitTimeMs = attackClip.duration * entry.hitAt * 1000;

    setTimeout(() => {
        /* 3. Pick a random reaction from the pool */
        const reactionFile = entry.reactions[
            Math.floor(Math.random() * entry.reactions.length)
        ];
        const reactionClip = reactionClipMap[reactionFile];
        if (!reactionClip) return;

        /* 4. Play it at the tuned speed */
        const action = npcMixer.clipAction(reactionClip);
        action.setEffectiveTimeScale(entry.npcSpeed);
        action.setLoop(THREE.LoopOnce, 1);
        action.clampWhenFinished = true;
        action.play();

        /* 5. Fade back to idle when it ends */
        const dur = reactionClip.duration * 1000 / entry.npcSpeed;
        setTimeout(() => {
            action.fadeOut(0.2);
            npcIdleAction.reset().setEffectiveTimeScale(1).fadeIn(0.2).play();
        }, dur);
    }, hitTimeMs);
}
The game doesn’t need to know about sliders, previews, or localStorage. It just reads numbers and applies them.
Key Takeaways
1. The viewport is sacred. Never cover it. Bottom pane > modal.
2. Auto-preview on every slider release. Sub-100 ms feedback loops turn a config tool into a toy.
3. Bump storage schemas with migration functions. Never break saved data. Ship v4, support v1 through v4.
4. Don’t over-solve for correctness. A static minimum on a slider beats a dynamic collision solver — simpler, more predictable, designer-friendly.
5. Measure the right axis.size.x for side-by-side, size.z for face-to-face. Bounding boxes at bind pose lie.
6. JSON is the contract. The tool and the game should communicate through data, not code.
7. Ship with fallbacks. Server behavior is a variable you don’t control. A hardcoded file list costs 20 lines and saves hours.
The tool exists to answer one question per attack: “When the player does X, what does the NPC do, where, and how fast?” Everything else is scaffolding.
In game development, “feel” is everything. When building a parkour engine, movement must feel continuous. If a player performs an action and the character suddenly “snaps” or “teleports” from one height to another, the immersion is shattered.
Recently, while developing a parkour prototype using Three.js, I encountered a critical failure in the Swing Mechanic. This article documents the evolution of that feature: a journey from a rigid, ground-only movement to a fully realized, height-aware physics system.
Phase 1: Solving Input Rigidity
Initially, the swing mechanic was functionally primitive. The system was logically bound to a single state: the player had to be standing on the floor to interact with the environment.
The Problem: State-Dependent Input
The input handler restricted the KeyF (Swing) action inside a conditional block that only checked if the player’s state was ‘ground’. This created a “dead zone” where jumping or falling made the mechanic unreachable.
The Problematic Code:
code JavaScript
// ❌ THE PROBLEM: Input is locked to the 'ground' state
function onPress(code) {
    if (state === 'ground') {
        switch (code) {
            case 'KeyE': tryHang(); break;
            case 'KeyF': trySwing(); break; // Logic fails if state is 'air'
        }
    }
}
The Fix: Universal Input Triggering
To achieve true parkour flow, a player must be able to grab a bar mid-air. I refactored the input logic to decouple the swing trigger from the grounded state.
The Optimized Code:
code JavaScript
// ✅ THE FIX: Decoupling input from the 'ground' state
function onPress(code) {
    if (state === 'ground') { /* ...ground-only actions... */ }

    // The swing trigger is now state-agnostic
    if (code === 'KeyF') {
        trySwing(); // Works during 'ground' OR 'air' states
    }
}
Phase 2: The “Teleportation Pop” Bug
Once the player could grab the bar from the air, a much more jarring issue emerged: Kinematic Discontinuity. If a player jumped from a high building and grabbed a bar, they would instantly “teleport” to the floor the moment they touched the bar.
The Problem: Hard-Coded Coordinate Snapping
The bug originated in the trySwing function. Upon engagement, the system was hard-coding the player’s vertical position (Y_pos) to 0 (the ground plane).
The Problematic Code:
code JavaScript
// ❌ THE PROBLEM: Hard-coded ground snap
function trySwing() {
    // ... logic to find bar ...

    // This '0' forced the player to the floor instantly.
    pos.set(targetX, 0, targetZ);

    state = 'swing';
}
The resulting visual “jitter” followed this sequence:
Grab: Player engages the bar mid-air.
Teleport: Character instantly snaps to Y=0Y=0 (the ground).
Correction: The physics engine realizes the player is actually above a block.
Pop: The character is violently “yanked” back up to the block.
Phase 3: The Advanced Physics Solution
To achieve a professional “feel,” I implemented a three-tier optimization strategy: Height Memory, Sinusoidal Interpolation, and Smart Landing.
Step 1: Temporal Height Memory
We moved away from hard-coded values by implementing Height Memory. The system now captures the player’s exact vertical position (Y_start) at the moment of engagement.
The Optimized Code:
code JavaScript
// ✅ Inside trySwing()
swingStartY = pos.y; // Capture the exact height of the jump/fall

// Snap to the BAR height, not the floor, preserving verticality
pos.set(targetX, bar.y, targetZ);
Step 2: Sinusoidal Path Interpolation
A natural swing follows an arc, not a straight line. I used Linear Interpolation (LERP) to transition between the starting height (Y_start) and the landing height (Y_land), combined with a Sine Wave to simulate gravitational momentum.
The Optimized Code:
code JavaScript
// ✅ THE FIX: Smooth height interpolation via Sinusoidal Arc
function updateSwing() {
    const t = clamp(activeAction.time / duration, 0, 1);
    const u = t * t * (3 - 2 * t); // Smoothstep easing

    // LERP: Move from captured start height to predicted landing height
    const heightTransition = THREE.MathUtils.lerp(swingStartY, swingLandY, u);

    // Sinusoidal Arc: Adds a "swing boost" to create a physical curve
    const arcHeight = Math.max(swingStartY, swingLandY, 1.0) * 0.5;
    pos.y = heightTransition + arcHeight * Math.sin(Math.PI * u);
}
Step 3: Smart Landing (Conditional State Switching)
Finally, we addressed the “end-of-animation” transition. If the swing ends over a platform, we snap to it. If the swing ends in mid-air, we must avoid snapping to the ground and instead transition the player into a natural falling state.
The Optimized Code:
code JavaScript
// ✅ THE FIX: Conditional landing logic
function finishSwing() {
    if (swingLandY > 0) {
        // Scenario A: Surface detected -> Transition to Grounded
        pos.x = swingTargetPos.x;
        pos.y = swingLandY;
        state = 'ground';
    } else {
        // Scenario B: No surface detected -> Transition to Airborne (Natural Fall)
        state = 'air';
        airMode = 'fall';
    }
}
Conclusion
By moving away from hard-coded coordinate snapping and embracing a State-Based Physics model, we transformed a glitchy, broken mechanic into a fluid movement system.
Key Takeaway for Developers: In any physics-based engine, always respect the player’s current momentum and position. Never force a coordinate unless you have mathematically accounted for the transition from the previous state.
Building Breakout: A Tiny Offline Breakout Game With Emoji Chaos
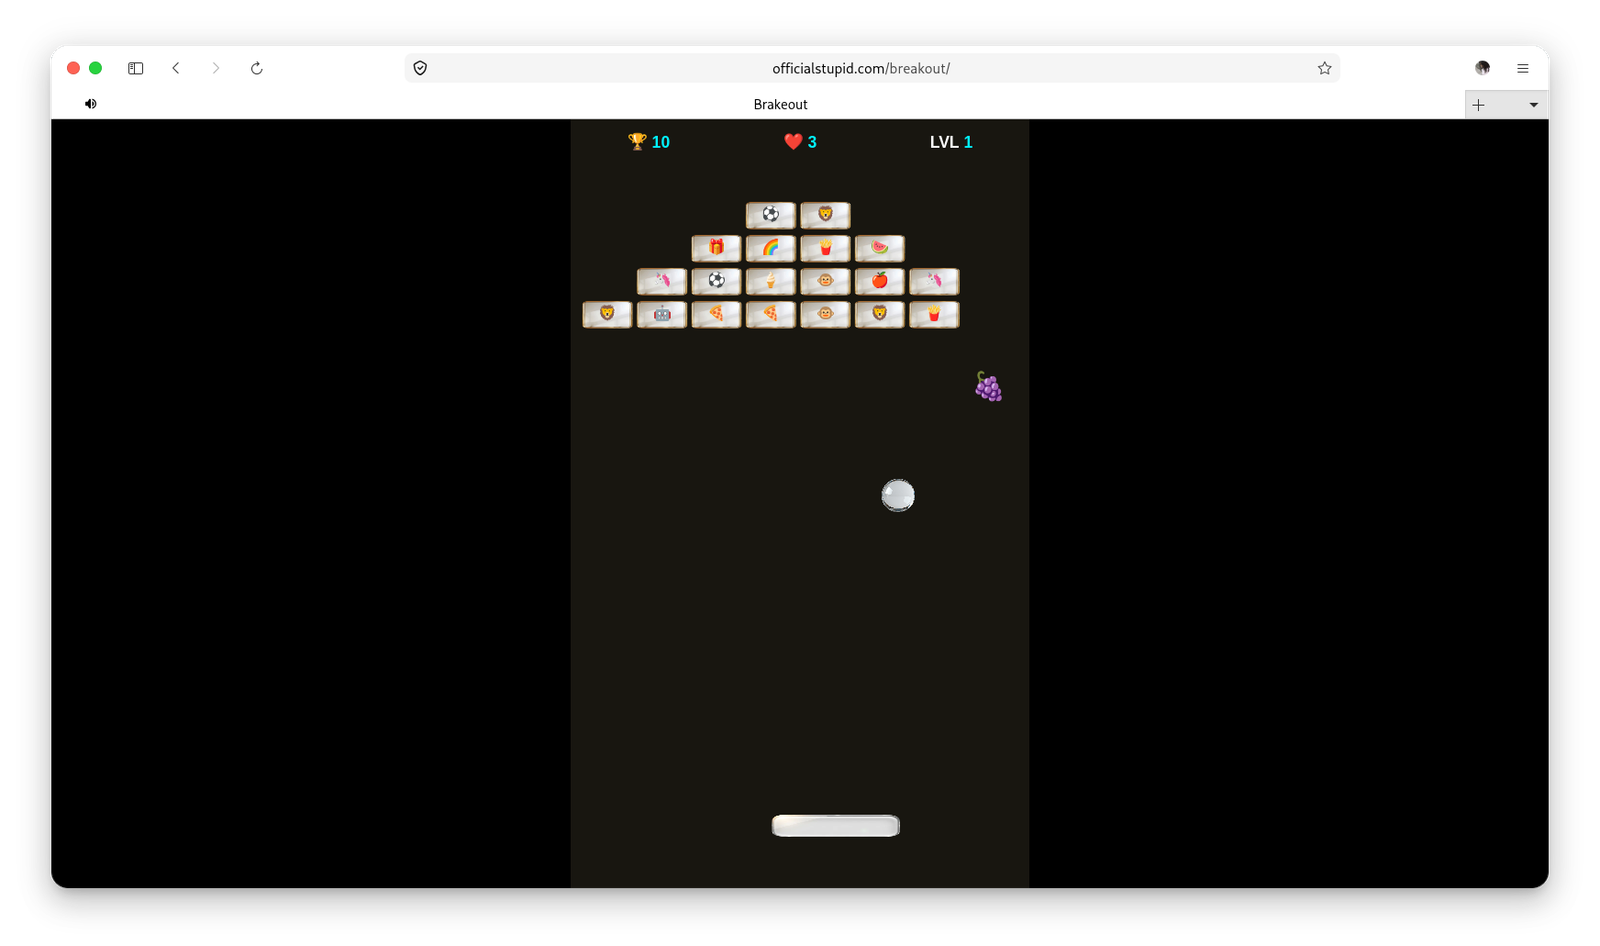
Breakout started as a plain Breakout clone: a paddle, a ball, and rows of bricks. Over a few sessions it grew into a small offline-ready PWA with power-ups, animations, generated sound, and a few surprises. Here is what we built and how it works.
The Game
Shaped levels. Nine hand-made brick patterns (pyramid, heart, 0, 8, 6, A, W, M) drawn from tiny string maps. After level 9, symmetric random layouts take over.
Emoji bricks. Every brick carries an emoji, and a few of them are special.
Fully offline. It runs as an installable PWA and works in airplane mode.
No audio files. All sound is generated live with the Web Audio API.
The Special Bricks
Emoji
What it does
⚽️
Piercing ball for 10 seconds. It smashes through bricks without bouncing.
🌈
Rainbow splash. It destroys every brick in a small radius.
🍎
A falling apple. Catch it and it grows, goes BOOM, and turns the ball big for 8 seconds while giving it a speed burst.
🍇
A falling grape. Catch it and it grows, goes BOOM, and fires two fast bullet-balls upward in a fan.
💎
Bubble shield. Every brick gets a glowing shield for 30 seconds and needs two hits.
🦖
A dino stomps across the screen while the whole screen shakes. Big levels get two dinos.
❤️
Extra life. It appears on every 5th level, or when a bomb leaves you at 1 life.
💣
Two hidden bomb carriers per level. Only one bomb falls at a time, and catching it on the paddle costs a life (never the last one).
The Polish
Grow, then boom. Caught fruit swells up with a rising charge sound, then explodes into particles and a shockwave ring.
Bullet speed. Shot balls launch at about twice the speed, with a yellow trail, and ease back to normal over about a second and a half.
Heart drama. When a bomb costs you a life, the ❤️ in the HUD shakes, cracks into 💔, sheds pieces, and heals back.
Smooth big ball. The ball scales up and down instead of snapping.
Bugs We Hunted
The freeze. One error inside the animation frame killed the whole loop. The fix was a try/catch around each frame, a check for removed bricks during a rainbow splash, and a fallback for browsers without roundRect.
Splice while iterating. Removing items from an array during forEach skips the next one. All loops now run backwards.
Tunneling. Fast balls could skip through thin bricks, so each frame is split into sub-steps of 8px or less.
Stacking timers. Power-up timers now count down in game time, so they can’t stack, can’t fire late, and pause with the game.
Phone shake lag. Moving the whole HTML container every frame was heavy on phones. The shake now happens inside the canvas.
Tiny Code Tour
Levels are strings."01100110" is one row, and 1 means a brick:
Tunneling fix. Move in small steps and check bricks after each one:
js
const n = Math.max(1, Math.ceil(ball.v / 8));
for (let s = 0; s < n; s++) { ball.advance(n); hitBricks(ball); }
Offline in a few lines. The service worker caches the page and images. It uses network-first for the page and cache-first for assets, and the cache name includes the file’s modified time, so uploading a new index.php refreshes everything automatically:
One-bomb rule. New bombs wait in a queue until the last one is gone:
js
if (fruits.some(f => f.type === 'bomb')) bombQueue.push({x, y});
else fruits.push(new PowerUp(x, y, '💣', 'bomb'));
Stack
One index.php file, plain Canvas 2D, Web Audio, a service worker and a manifest, plus four images (ball, paddle, block, fav). There are no frameworks and no build step.
What’s Next
A separate maskable icon and 192px icon for Android
High score saving
Pause button and a smarter touch offset so a finger doesn’t cover the paddle
More brick types with different hit points
Building it was mostly a loop of “add one silly idea, break something, fix it.” Each fix made the game a little tighter, and each silly idea made it a little more fun.
Here is the fresh script. It will automatically loop through all your original 3D files, apply the high-quality WebP + 512px optimization, and save them as _clean.glb.
Copy and paste this into your terminal:
bash
for f in *.glb; do
   # Skip clean files if rerun
   [[ "$f" == *"_clean.glb" ]] && continue

   base="${f%.glb}"
   echo "Optimizing $f to high-quality _clean.glb..."

   # 1. Resize to 512x512 (keeps details crisp)
   gltf-transform resize "$f" "${base}_clean.glb" --width 512 --height 512 && \

   # 2. Prune duplicate/empty data
   gltf-transform prune "${base}_clean.glb" "${base}_clean.glb" && \

   # 3. Compress textures using WebP (small size, high quality)
   gltf-transform webp "${base}_clean.glb" "${base}_clean.glb" --slots baseColor && \

   # 4. Smooth Draco geometry compression (prevents distortion)
   gltf-transform draco "${base}_clean.glb" "${base}_clean.glb" --quantizePosition 11 --quantizeTexcoord 12
done